Using Stripe API in React Native with fetch
November 3, 2015
Stripe makes it easy to accept payments online. Stripe offers an npm package with nice documentation.
Problem with using Stripe in React Native
I added stripe to my React Native application using following command.
npm install stripe --save
Added Stripe to the project as shown below.
var stripe = require('stripe')('stripe API key');
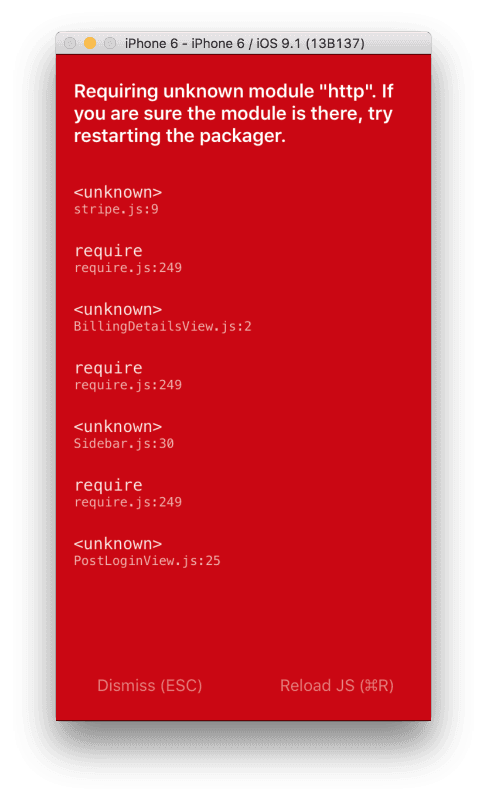
And now I'm getting following error.

This's because npm package uses stripe.js and stripe.js needs http provided by Node.JS.
Our React Native code does not actually run on Node.JS. I know while building
React Native we use NPM and we have a node server running in the background so
it feels like we are in Node.JS land and we can use everything Node.JS has to
offer. But that's not true. React Native code can't depend on Node.JS because
Node.JS is not shipped with ios. It means we can't use any of Node.JS packages
including http. It means we can't use stripe npm module.
Now you can remove require('stripe') line that was added in the last step.
Solution
React Native comes with Fetch api. From the documentation
The Fetch API provides a JavaScript interface for accessing an manipulating parts of the HTTP pipeline, such as requests and responses. It also provides a global fetch() method that provides an easy, logical way to fetch resources asynchronously across the network.
stripe.js is a nice wrapper around stripe api. stripe api is very well documented and is easy to use. Since we can't use stripe.js we will use stripe api.
We will use fetch to create a credit card token using api.
return fetch("https://api.stripe.com/v1/tokens", {
  method: "post",
  headers: {
    Accept: "application/json",
    "Content-Type": "application/x-www-form-urlencoded",
    Authorization: "Bearer " + "<YOUR-STRIPE-API-KEY>",
  },
  body: formBody,
});
Here, the header has 3 keys. Lets go through them one-by-one:
'Accept': 'application/json': Designates the content to be in JSON format.'Content-Type': 'application/x-www-form-urlencoded': This tells the endpoint that the payload will be one giant query string where name and value pairs will be separated by the ampersand.'Authorization': 'Bearer ' + '<YOUR-STRIPE-API-KEY>': This key is to authorize our actions on Stripe. HereBeareris just a prefix which we need to attach to the api-key because Stripe uses OAuth 2.0 . You can read more on the Bearer token usage here .
Payload needs to contain credit card details.
var cardDetails = {
  "card[number]": "1111 2222 3333 4444",
  "card[exp_month]": "01",
  "card[exp_year]": "2020",
  "card[cvc]": "123",
};
Since the Content-Type is application/x-www-form-urlencoded, the payload
should be one query string. An example of this would be:
city=Miami&state=Florida
Let's prepare a proper payload.
var formBody = [];
for (var property in cardDetails) {
  var encodedKey = encodeURIComponent(property);
  var encodedValue = encodeURIComponent(cardDetails[property]);
  formBody.push(encodedKey + "=" + encodedValue);
}
formBody = formBody.join("&");
That's it. Now we can attach formBody to the body part of the fetch request
and we are good to go.
Final solution
Here's the whole code snippet.
"use strict";

var stripe_url = "https://api.stripe.com/v1/";
var secret_key = "<YOUR-STRIPE-API-KEY>";

module.exports.createCardToken = function (cardNumber, expMonth, expYear, cvc) {
  var cardDetails = {
    "card[number]": cardNumber,
    "card[exp_month]": expMonth,
    "card[exp_year]": expYear,
    "card[cvc]": cvc,
  };

  var formBody = [];
  for (var property in cardDetails) {
    var encodedKey = encodeURIComponent(property);
    var encodedValue = encodeURIComponent(cardDetails[property]);
    formBody.push(encodedKey + "=" + encodedValue);
  }
  formBody = formBody.join("&");

  return fetch(stripe_url + "tokens", {
    method: "post",
    headers: {
      Accept: "application/json",
      "Content-Type": "application/x-www-form-urlencoded",
      Authorization: "Bearer " + secret_key,
    },
    body: formBody,
  });
};
This is an example of registering a credit card with stripe and getting the token. Similar implementations can be done for other API endpoints.
Follow @bigbinary on X. Check out our full blog archive.