How to remotely EV code-sign a Windows application using ssl.com
December 17, 2024
Recently, we built NeetoRecord, a loom alternative. The desktop application was built using Electron. In a series of blogs, we capture how we built the desktop application and the challenges we ran into. This blog is part 9 of the blog series. You can also read about part 1, part 2, part 3, part 4, part 5, part 6, part 7 and part 8.
Code-signing allows Windows to verify the identity of an application's publisher, making it authentic and trustworthy. Additionally, code-signing helps applications comply with Windows security policies, avoiding warnings and installation blocks, ultimately building user confidence and providing a smoother, safer experience.
What is code-signing?
At its core, code-signing involves using a cryptographic hash function to create a unique digital fingerprint of the code. This fingerprint and a certificate from a trusted Certificate Authority (CA) form the digital signature. When users download and run the software, their operating system or browser checks the digital signature to verify its authenticity.
There are two types of certificates we can use to sign a Windows application:
- Code-signing Certificate
- EV Code-signing Certificate
A Standard Code-signing Certificate provides our application a baseline level of security and trust. While it verifies the software publisher's identity and ensures that the code has not been tampered with since it was signed, the validation process is less rigorous than EV certificates. It shows a warning during installation that goes away once enough users have installed our application and we've built up trust.
Extended Validation (EV) Code-signing Certificates, on the other hand, offer the highest level of security and trust. These certificates require a more rigorous vetting process by the Certificate Authority (CA) before they are issued, ensuring that the entity requesting the certificate is thoroughly verified. This process involves verifying the legal, physical, and operational existence of the entity, as well as confirming the identity of the individual requesting the certificate.
Unlike Apple, Microsoft allows developers to purchase these certificates on the open market. They are typically sold by the same companies that offer HTTPS certificates. Prices can vary, so it's worth shopping around. Some popular resellers include:
- DigiCert code-signing certificate
- Certum EV code-signing certificate
- Entrust code-signing certificate
- SSL.com EV code-signing certificate
Why choose EV code-signing?
Even though EV code-signing certificates are comparatively pricier than standard code-signing certificates and have a rigorous vetting process. It is important to note that, effective June 2023, the new CA/Browser Forum code-signing requirements is in effect. As a result, publicly trusted Certificate Authorities (CA) will require that certificate requestors use an appropriately certified (FIPS 140-2 level 2 or Common Criteria EAL 4+) hardware security module (HSM) to protect their code-signing private keys. This requirement applies to the issuance of both extended validation (EV) certificates and non-EV certificates.
In simple words, what this means is that standard code-signing certificates no longer provides benefits they provided in the past. Windows will treat our application as completely unsigned and display the equivalent warning dialogs. Another thing to note here is that since certificates are required to be stored on an HSM, the certificate cannot be simply downloaded onto a CI infrastructure.
Cloud-based EV code-signing
In the past, EV code-signing could only be performed using a physical USB dongle. Upon purchasing an EV certificate, the provider would send a physical USB device containing the certificate. This method required code-signing to be executed from a local machine, which posed flexibility challenges, especially for team environments. Additionally, physical USB dongles are prone to loss or damage.
As a solution to this, many certificate providers now offer "cloud-based EV signing," where the signing hardware is housed in their data centers, allowing us to remotely sign code.
In this blog, we will look into how we can remotely EV code-sign a Windows application built using Electron, using SSL.com's eSigner CodeSignTool
Purchase and validate EV certificate from SSL.com
For the NeetoRecord desktop application, we used EV certificate from ssl.com and hence we will use ssl.com as an example in this blog.
Once we sign into SSL.com and purchase the EV code-signing certificate, We need to validate the certificate. For this, we need to fill out the EV subscriber agreement and EV authorization form. Both of them can be downloaded from here. Also, make sure we have D-U-N-S number or equivalent ready before starting the validation process. To know about all the requirements in detail, follow this article or watch this Youtube video.
eSigner and CodeSignTool
eSigner is SSL.com's cloud signing service that allows remote access to its HSM hardware from anywhere. We can use our SSL.com signing credentials to access it.
CodeSignTool is a command-line tool for remotely signing various types of scripts like MSI installers, Microsoft Authenticode etc., with eSigner EV code-signing certificates. Hashes of the files are sent to SSL.com for signing so that the code itself is not sent. This is ideal where sensitive files need to be signed but should not be sent over the wire for signing. CodeSignTool is also ideal for automated batch processes for high-volume signings or integration into existing CI/CD pipeline workflows.
Enroll in eSigner
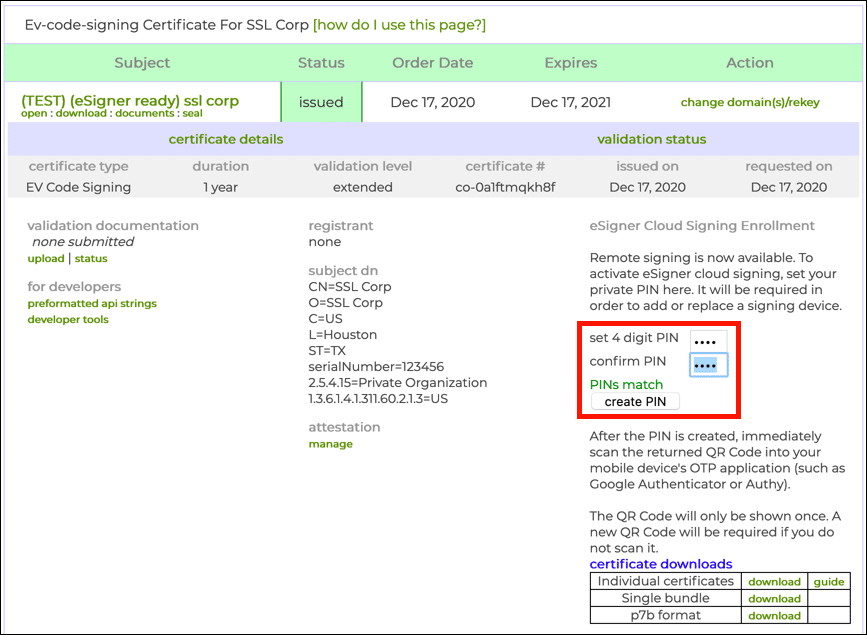
To be able to code-sign the application using eSigner, we need to first enroll in eSigner. To do so,
- Navigate to an issued Code-signing order in our SSL.com account. Note that the
order is labeled eSigner Ready.

- Click one of the download links.

- Create and confirm a 4-digit PIN and click the create PIN button.

- Our certificate will be generated, and after a few moments, a QR code will
appear above the certificate downloads table.

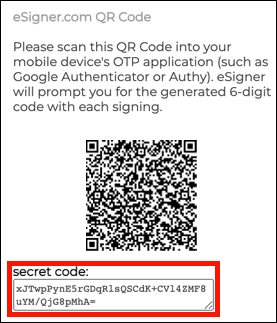
When the eSigner QR code is displayed for our certificate, copy and save the
secret code value shown in a safe location. This is the TOTP (time-based
one-time password) secret associated with our eSigner certificate. Just as 2FA
authentication software like Authy can scan this value from the QR code to
generate valid OTPs for code-signing, CodeSignTool can also use it to generate
OTPs are automatically generated during the signing process. In the next
section, we will use this secret code as totp_secret while integrating with
CodeSignTool.
For more information, check out these articles: How to Enroll in eSigner and Automate eSigner EV Code-signing.
Obtain Required Credentials
We need to provide the following credentials to the CodeSignTool for it to successfully connect with eSigner and code-sign the application.
If we haven't purchased a certificate yet and want to try out how it works, SSL.com offers eSigner Demo Credentials and Certificates.
- username
- password
- totp_secret
- credential_id
For username and password, use the same credentials we used to sign in to
SSL.com. If needed, we can also add additional users to the same account. For
the totp_secret, use the secret code we saved during the eSigner enrollment
process.

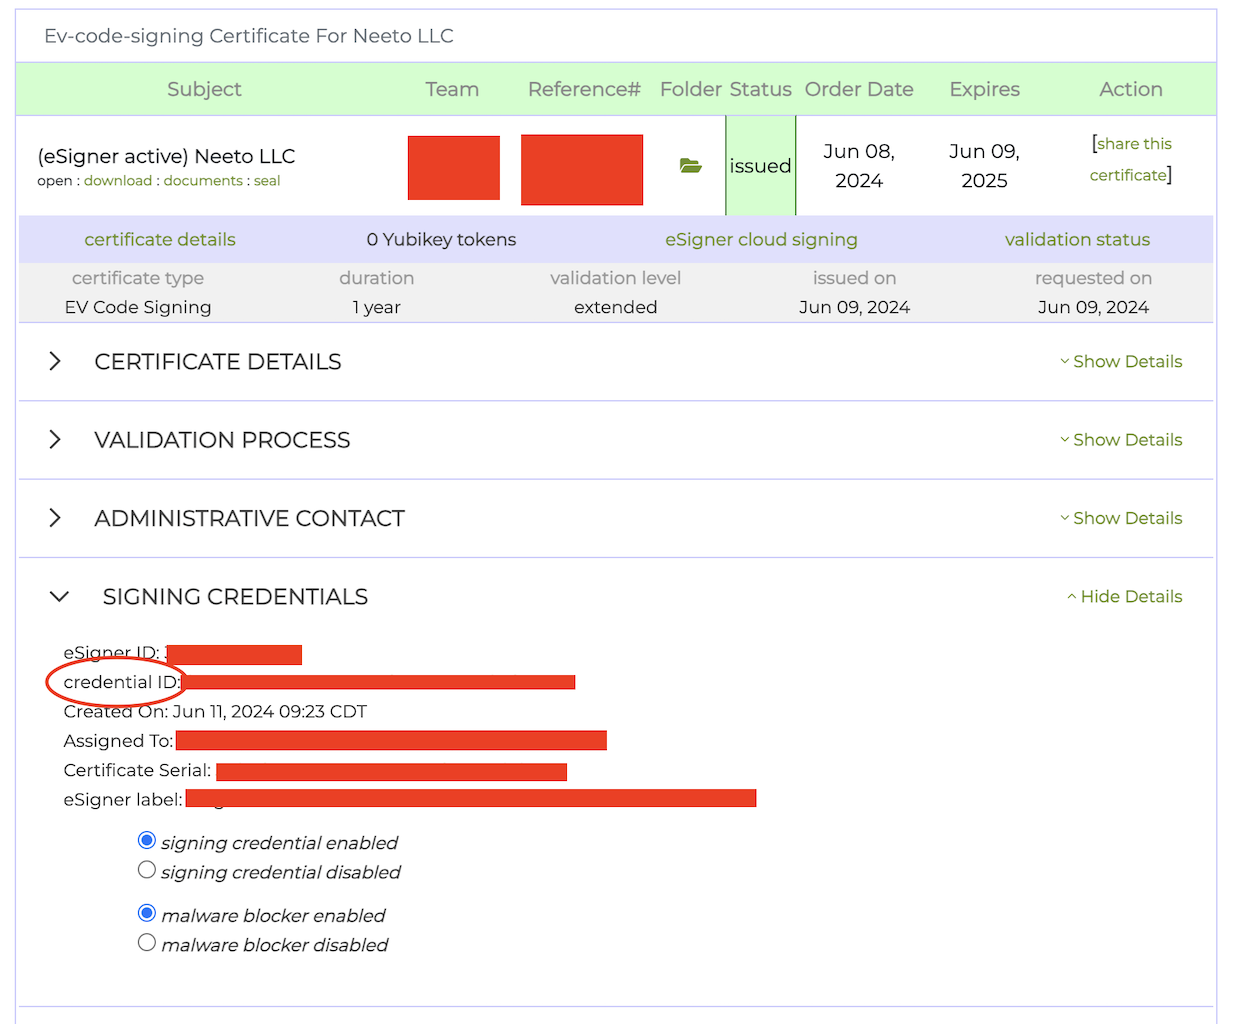
To obtain the credential_id, navigate to the certificate details section on
the SSL.com dashboard. The credential_id will be listed under
SIGNING CREDENTIALS.

After acquiring all the credentials, add them to GitHub Secrets with the following names:
username->WINDOWS_SIGN_USER_NAMEpassword->WINDOWS_SIGN_USER_PASSWORDtotp_secret->WINDOWS_SIGN_USER_TOTPcredential_id->WINDOWS_SIGN_CREDENTIAL_ID
Load up these secrets as environment variables in our Github Action workflow.
- name: Publish releases
    env:
      AWS_ACCESS_KEY_ID: ${{secrets.AWS_ACCESS_KEY}}
      AWS_SECRET_ACCESS_KEY: ${{secrets.AWS_SECRET}}
      WINDOWS_SIGN_USER_NAME: ${{ secrets.WINDOWS_SIGN_USER_NAME }}
      WINDOWS_SIGN_USER_PASSWORD: ${{ secrets.WINDOWS_SIGN_USER_PASSWORD }}
      WINDOWS_SIGN_USER_TOTP: ${{ secrets.WINDOWS_SIGN_USER_TOTP }}
      WINDOWS_SIGN_CREDENTIAL_ID: ${{ secrets.WINDOWS_SIGN_CREDENTIAL_ID }}
    run: npm exec electron-builder -- --publish always -mwl
Integrate CodeSignTool
The Windows version of CodeSignTool is provided as a batch file
(CodeSignTool.bat), while the Linux/macOS version is available as a shell
script (CodeSignTool.sh). We can find the download links and more details
about CodeSignTool in
this article
For our purposes, we'll be using the shell script. Download the Linux/macOS version, unzip it, and place it in the root directory of our Electron project.
To integrate the CodeSignTool into the Electron build process, create a script
(./scripts/windows-sign.mjs) that runs the CodeSignTool shell script.
import path from "path";
import fs from "fs";
import childProcess from "child_process";

const TEMP_DIR = path.join(__dirname, "../release", "temp");

if (!fs.existsSync(TEMP_DIR)) {
  fs.mkdirSync(TEMP_DIR);
}

const sign = file => {
  const USER_NAME = process.env.WINDOWS_SIGN_USER_NAME;
  const USER_PASSWORD = process.env.WINDOWS_SIGN_USER_PASSWORD;
  const CREDENTIAL_ID = process.env.WINDOWS_SIGN_CREDENTIAL_ID;
  const USER_TOTP = process.env.WINDOWS_SIGN_USER_TOTP;

  if (USER_NAME && USER_PASSWORD && USER_TOTP && CREDENTIAL_ID) {
    console.log(`Windows code-signing ${file.path}`);
    const { name, dir } = path.parse(file.path);
    const tempFile = path.join(TEMP_DIR, name);

    const setDir = `cd ./CodeSignTool-v1.3.0`;
    const signFile = `./CodeSignTool.sh sign -input_file_path="${file.path}" -output_dir_path="${TEMP_DIR}" -credential_id=${CREDENTIAL_ID}   -username="${USER_NAME}" -password="${USER_PASSWORD}" -totp_secret="${USER_TOTP}"`;
    const moveFile = `mv "${tempFile}.exe" "${dir}"`;
    childProcess.execSync(`${setDir} && ${signFile} && ${moveFile}`, {
      stdio: "inherit",
    });
  } else {
    console.warn(`windows-sign.js - Can't sign file, credentials are missing`);
    process.exit(1);
  }
};

export default sign;
The script exports a sign function that accepts an object containing the path
to the file that needs to be signed. It reads all the necessary credentials from
environment variables and then passes these credentials along with the file
path.
To finish up, pass this script to the electron-builder configuration.
 "build": {
    "productName": "MyProduct",
     "win": {
      "target": {
        "target": "nsis",
        "arch": [
          "x64"
        ]
      },
      "signingHashAlgorithms": [
        "sha256"
      ],
      "sign": "./scripts/windows-sign.mjs",
      "publisherName": "Neeto LLC",
      "artifactName": "${productName}-Setup-${version}.${ext}"
    },
 }
Here, we pass the script path to the win.sign field in the electron-builder
configuration. Once added, electron-builder will call this script for each
file that needs to be signed.
Great! With this, we've completed the EV code-signing process for our Windows application. Now, when we run the GitHub Action workflow, it will successfully code-sign our Windows application.
SSL.com pricing
As mentioned earlier, EV code signing certificates are expensive. SSL.com charges $349 per year for an EV code signing certificate, with discounts available for multi-year purchases. For more information, visit: https://www.ssl.com/certificates/ev-code-signing/buy/.
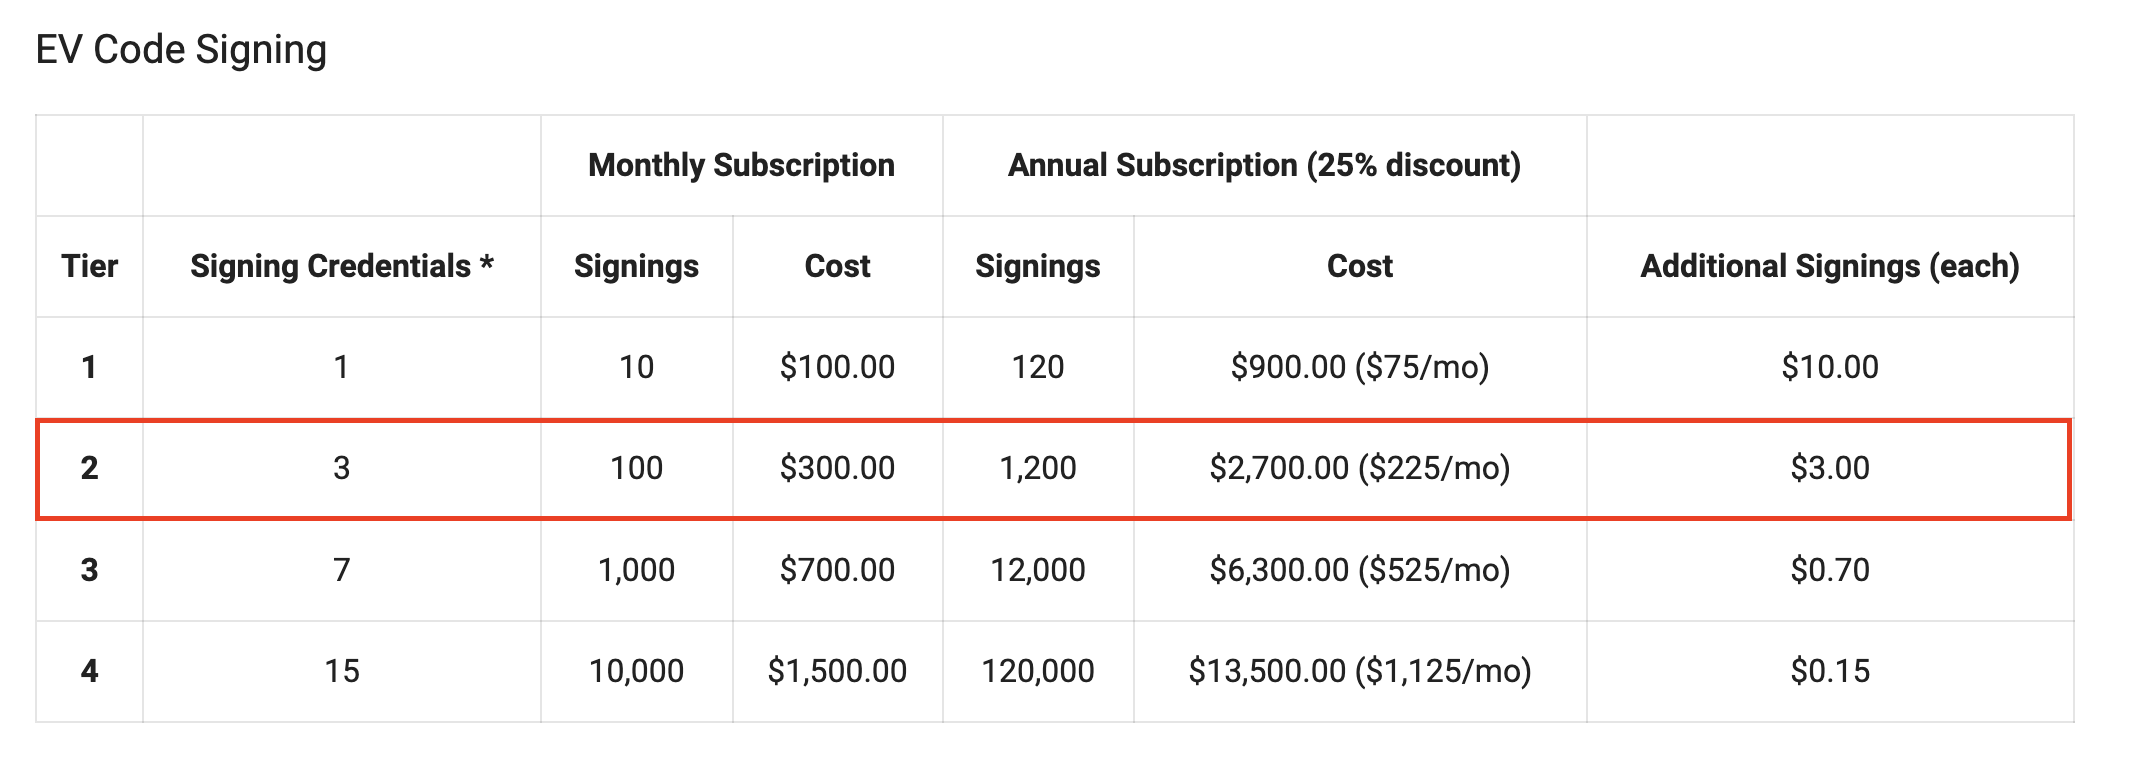
In addition to the certificate cost, we must also subscribe to the eSigner cloud signing service, which is a subscription-based service. The Tier 1 plan costs $100 per month and allows a maximum of 10 files to be signed, equating to a minimum of $10 per signing. An Electron application requires four files to be signed per build. This means we can only build an Electron application twice per month under the Tier 1 plan.
If we need to build the application more than twice per month, we recommend upgrading to Tier 2. This plan costs $300 per month and allows up to 100 file signings, reducing the cost to $3 per signing. For more information, visit: https://www.ssl.com/guide/esigner-pricing-for-code-signing/

Follow @bigbinary on X. Check out our full blog archive.